How to Convert Web Apps Into A Hybrid App

the transition from a traditional website to a mobile application is not just an upgrade; it’s a necessity. With the majority of internet users accessing content through mobile devices, having a mobile app can significantly boost your project’s reach and user engagement. However, the journey from a website to a mobile app might seem daunting for many.

Fear not! We will take you through a step-by-step journey on how to convert your website project into a mobile application for both iOS and Android platforms, using the innovative platform GoNative.io. Whether you’re a seasoned developer or a newcomer to the tech world, this blog aims to equip you with all the necessary information to make your mobile app transition as smooth as possible.These are the steps you can follow:

  1. Open your browser and logon to GoNative.io.
  2. Enter the URL of your web app and click on “Build”.
  3. Fill in the details of your app and click ”Build my app!” After this, you will need to wait for GoNative’s email.
  4. Check your email. In the email that you will receive from GoNative, click the Private management URL.
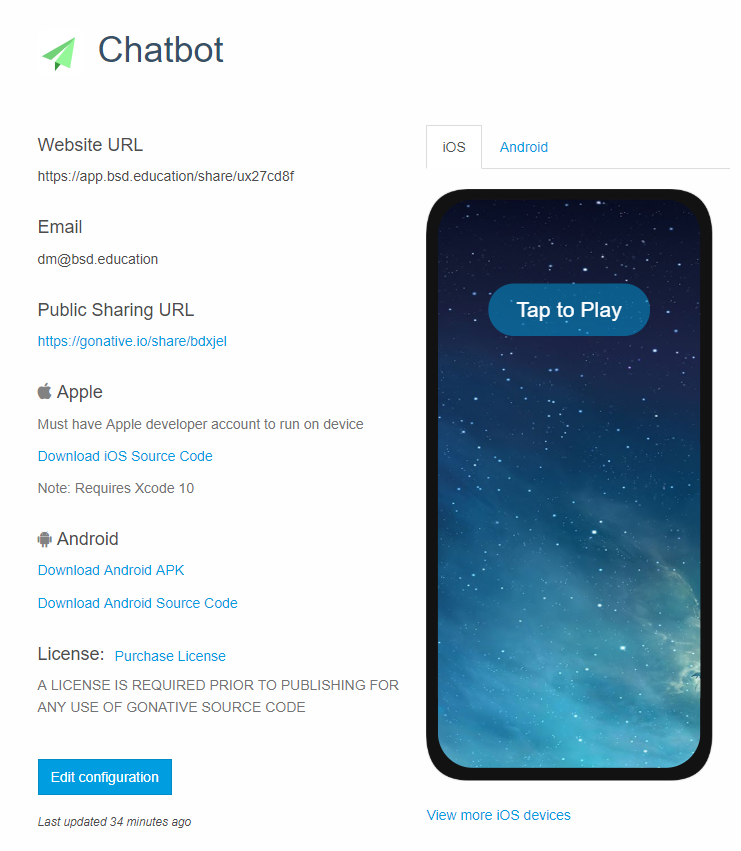
    Clicking on the above-mentioned link will direct to the following website:From there, you will do two things if you want to run your app using an iOS and Android devices.5

For Android:

Click on Download APK.

You have to download and transfer this file (APK) to the Android device where you want to install your app. You will need to allow the installation of this app before you can proceed. Once done, open the app from your app drawer.

For iOS:

To use your app in an iOS device, you would need to have an Apple Developer Account. You will also need to download Xcode before you can deploy your app. Xcode only runs on macOS devices.

  1. Sign up or Login to your Apple Developer Account.
  2. Download Xcode. Click the following link to download Xcode: Download Xcode
  3. Download iOS Source Code.
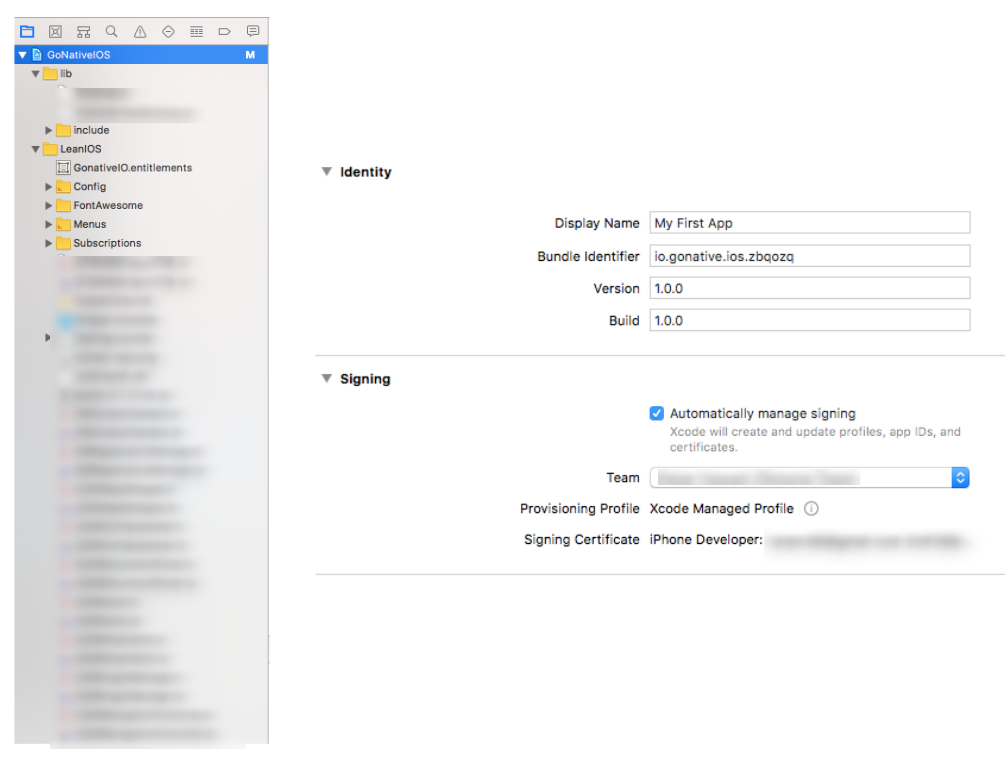
  4. Open the code using Xcode.bPq1cgMptp.gif
  5. Make final changes.b5
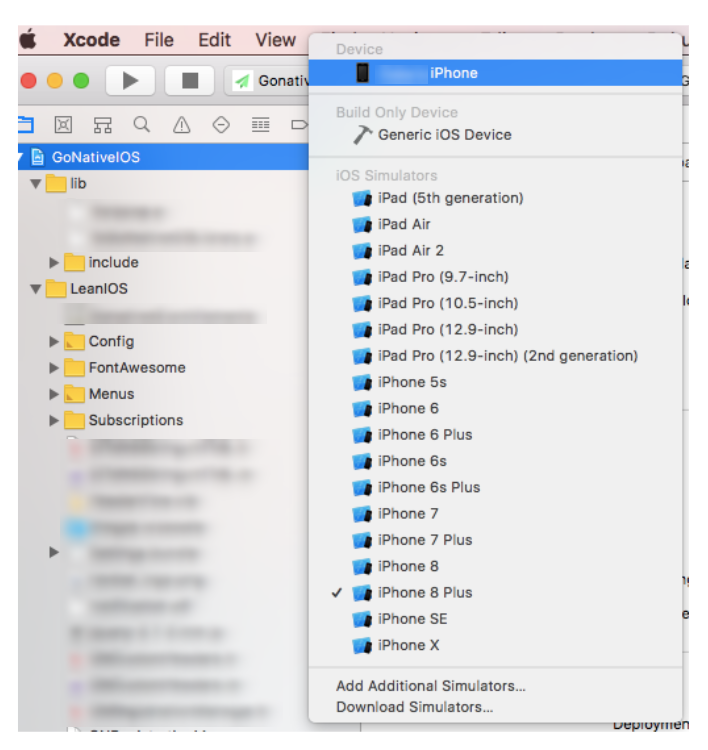
  6. Choose a device and deploy your app.b6

To know more about iOS App testing and deployment, visit Apple Developer Site 1.

How to Save Images in Piskel

Whether you’re working on a project or just experimenting with pixel art, our platform ensures your work is saved securely and accessible anytime. Let’s walk through the simple steps to save your Piskel images on BSD Online, making sure your creations are always just a few clicks away.

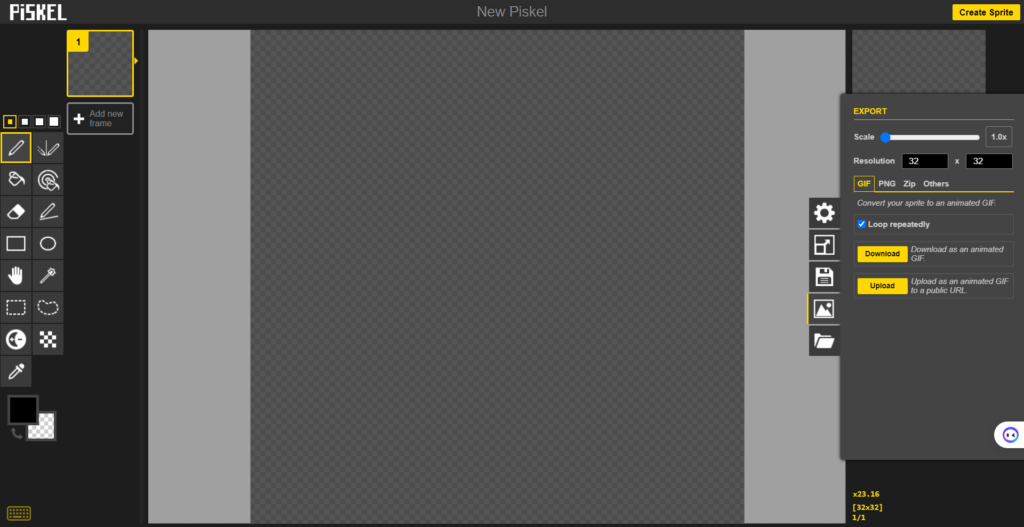
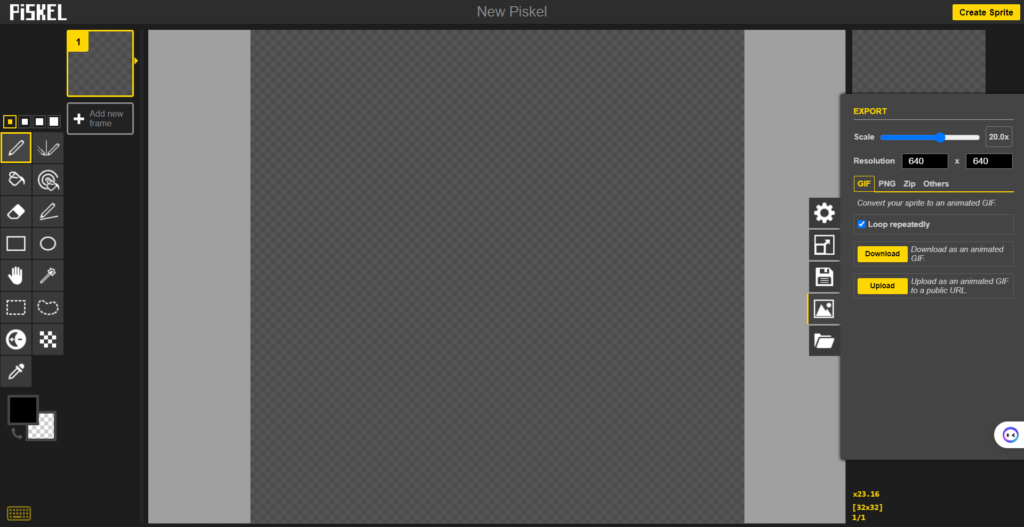
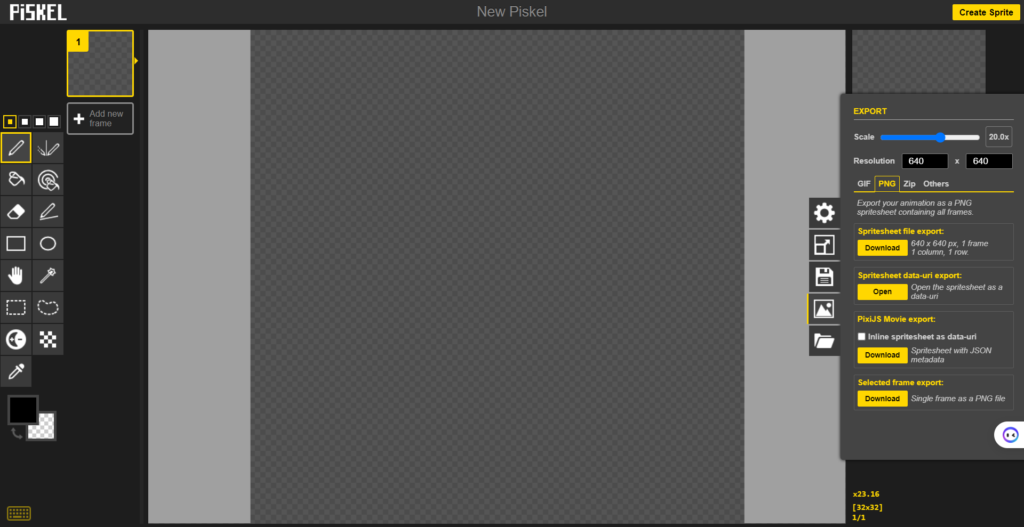
Step 1: Click the “Export” button on the right side of the screen. This will cause the Export menu to slide out, allowing you to choose further options.

Step 2: Slide the “Scale” up to “20.0x”. The numbers in the “Resolution” boxes should be in the 400-700 range.

Step 3: If the image is a gif (moving), click the first “Download” button. The text next to the button will say “Download as an animated GIF.” This will prompt you to save the image to your computer.

Step 4: If the image is a PNG (not moving), click the PNG tab, then select the first “Download” button. The text next to the button will display information about the image, including its size (“px”). This will prompt you to save the image to your computer.

Note: You can control the speed of GIFs in Piskel. This is done using the “FPS” slider in the upper right corner of the website. Above it, the animation you are creating will display as a preview.

Mastering Image Uploads on BSD Online

If you want to customize your project or add an image from your device to your sandbox, you can upload images to BSD Online.

Follow the steps below:

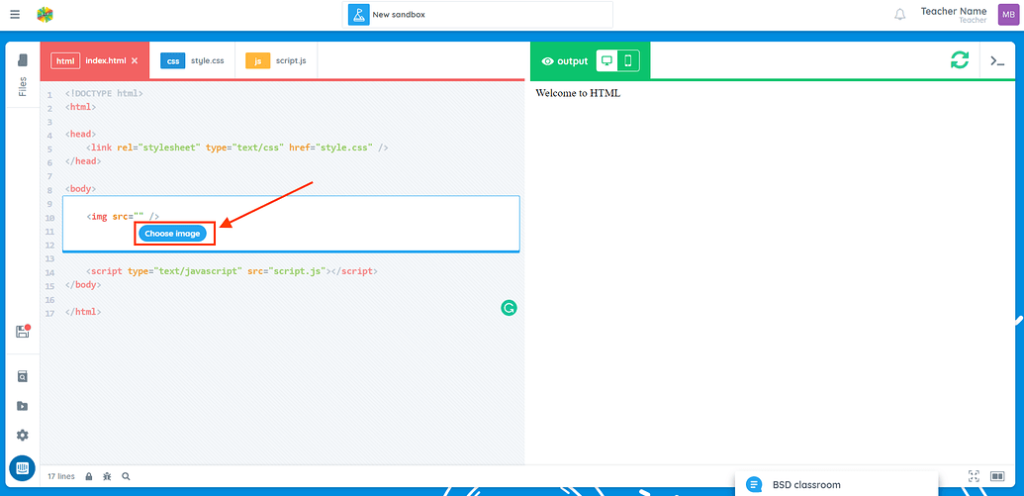
  1. Inside the project or sandbox, every time you type an <img> tag and add the src attribute, a “Choose image” button will appear, click “Choose image” to display the Image Library.

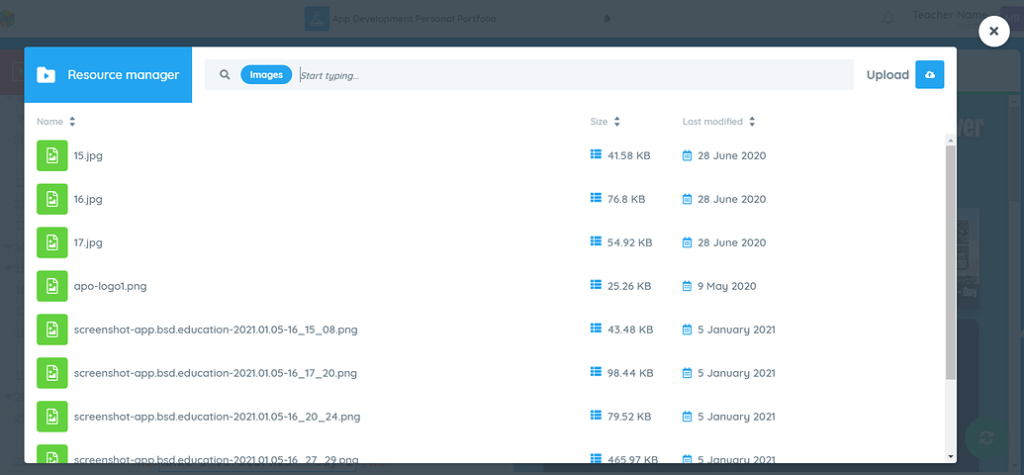
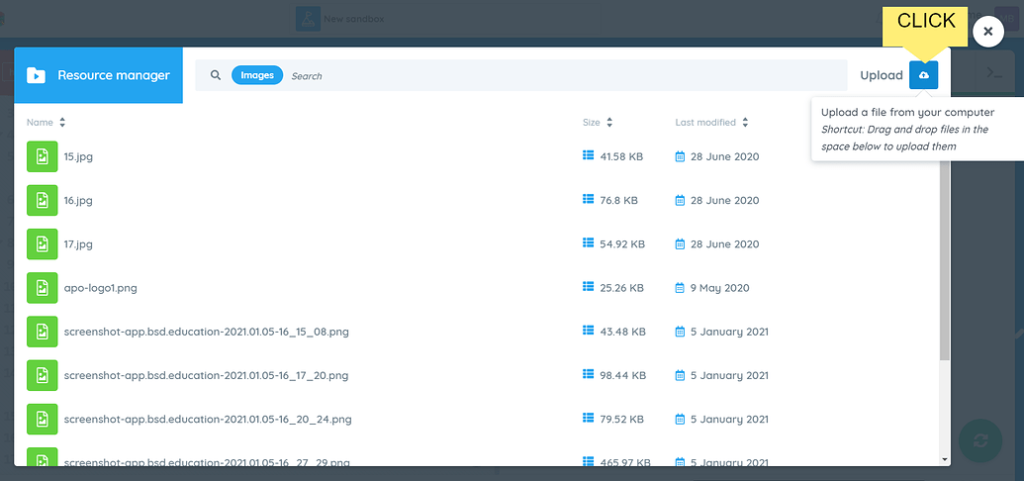
Here’s what a resource manager looks like:

  1. You can select from previously used images from the resource manager or if you want to use a new image, you can upload a new image file, click the “Upload” icon to upload an image from your computer. Make sure that the new image is highlighted before hitting the “Select” button. An image link will automatically be added as the src of the  tag you created.

Click the article to show you how it is done:

Student Resource Manager 14

Tip: Before uploading an image, make sure that you know where it is stored in your device so you can easily find them.

If you have more questions and other concerns, feel free to reach out to us through chat or send an email to support@bsd.education.

Integrating Computer Science, Computational Thinking, and Design Thinking into K-12 Core Curriculum

In the rapidly evolving landscape of education, it’s becoming increasingly evident that preparing students for the future requires more than just traditional subjects like math, science, and language arts. As technology continues to permeate every aspect of our lives, there’s a growing consensus among educators about the importance of integrating computer science, computational thinking, and design thinking into the K-12 core curriculum. By doing so, we not only equip students with essential skills for the future but also foster a mindset of innovation, problem-solving, and collaboration. 

Computer science, once considered a niche subject, has now emerged as a fundamental literacy in the digital age. It’s not just about coding; it’s about understanding algorithms, data structures, and computational processes. By introducing computer science concepts early on, we empower students to become creators rather than mere consumers of technology. Whether it’s learning to code with BSD Education or exploring robotics through hands-on projects, students develop critical thinking skills and gain a deeper understanding of how technology works.

However, computer science alone is not sufficient. Enter computational thinking – a problem-solving methodology rooted in the principles of computer science. It involves breaking down complex problems into smaller, more manageable parts, identifying patterns, and devising algorithms to solve them. Computational thinking transcends the boundaries of programming and can be applied across various disciplines. From analyzing historical data to optimizing logistical processes, students learn to approach challenges systematically and analytically. By integrating computational thinking into the core curriculum, we cultivate a mindset that is essential for success in the digital age.

But solving problems is only half the battle. Design thinking complements computational thinking by emphasizing empathy, creativity, and iterative prototyping. Originating from the world of product design, design thinking provides a human-centered approach to problem-solving. Students are encouraged to empathize with end-users, brainstorm innovative solutions, and test prototypes through rapid experimentation. By incorporating design thinking into the curriculum, we foster a culture of innovation where students learn to tackle real-world problems with empathy and creativity.

Now, the question arises – how can teachers integrate these concepts into their existing curriculum? The key lies in interdisciplinary connections and project-based learning. Instead of treating computer science, computational thinking, and design thinking as separate subjects, teachers can look for opportunities to integrate them into existing lessons.

For example, a history class could explore the impact of algorithms on historical events, a science class could analyze data using computational thinking principles, and an art class could incorporate design thinking into the creative process.

Language Arts: Students can analyze language patterns and structures using computational thinking concepts such as algorithms and loops. They could also use design thinking to create multimedia presentations or websites for their writing projects.

Mathematics: Teachers can incorporate computer science concepts by having students create algorithms for solving mathematical problems or exploring the mathematics behind coding algorithms. Additionally, design thinking can be applied to create visually appealing and user-friendly mathematical models or visualizations.

Physical Education: Students can apply computational thinking by designing algorithms for optimizing workout routines or analyzing sports data. Design thinking can be integrated by having students redesign sports equipment or create innovative fitness apps.

Social Studies: Computational thinking can be utilized to analyze large datasets related to historical events or societal trends. Students can also apply design thinking principles to propose solutions to contemporary social issues or design informative infographics about historical events.

Foreign Language: Computational thinking can be applied to language learning through the creation of algorithms for language translation or language learning apps. Design thinking can be used to design immersive language learning experiences or culturally relevant multimedia projects.

Music: Students can explore computational thinking through the creation of algorithms for composing music or analyzing musical patterns. Design thinking can be integrated by having students design innovative musical instruments or create visually engaging music videos.

Career and Technical Education (CTE): Students can apply computational thinking to solve real-world problems in their chosen career pathways, such as engineering, healthcare, or business. Design thinking can be used to develop prototypes or design solutions to industry-related challenges.

Environmental Science: Computational thinking can be utilized to analyze environmental data and model environmental processes. Design thinking can be applied to create sustainable solutions to environmental challenges or design eco-friendly products.

By integrating computer science, computational thinking, and design thinking across various subjects, teachers can provide students with interdisciplinary learning experiences that foster critical thinking, creativity, and problem-solving skills. It’s not just about preparing students for jobs in the tech industry; it’s about equipping them with essential skills and mindsets for success in an increasingly complex and interconnected world. By embracing interdisciplinary connections and project-based learning, teachers can empower students to become lifelong learners, critical thinkers, and innovative problem-solvers. As we navigate the challenges and opportunities of the future, this pedagogical imperative has never been more urgent or relevant.
How to extract a report in CSV using the “Export student progress report” feature

In recent years, there has been a growing interest in leveraging technology to improve education. One area where this is particularly promising is the use of data analytics to better understand what is happening in the classroom. With the help of the “Export student progress report” feature, it is possible to extract data from a classroom setting and use that data to gain insights into students’ performance and engagement.
Inside the classroom page, a new button in the tools menu has been added that allows teachers to export a CSV file containing the list of students with their progress data from the classroom.

The student’s classroom completion percentage, number of started sandboxes, student’s current location, last activity, time on a project step, errors, total classroom session duration and online status are included columns in the progress report.

This feature will help you as the teacher to track students’ progress and identify areas where students may need additional support to help them improve. Teachers can use “Export student progress report” to track student behavior, engagement, and performance and educators can gain a better understanding of what is happening in the classroom and provide the best learning environment.
If you have questions or concerns, let’s talk! Feel free to send an email to support@bsd.education or “start a conversation” through chat support!

Navigating the Digital Classroom Evolution

Twenty-two years ago, I embarked on a journey at the helm of business elective classes in a Rhode Island high school, shaping minds for the future. Back then, the classroom technology landscape was vastly different. Computers stood solitary, reserved for tasks like typing (better known as keyboarding today), computer applications, and occasional essay typing requests.

Our teaching methods thrived on hands-on experiences. We scoured newspapers for stock market insights, ventured on budgeting field trips to the mall (yes, you read that right!), and simulated financial transactions with fake checks. Alongside, we delved into word processing, spreadsheet wizardry, and the art of precision typing, essential skills for the future.

Fast forward twelve years, and my classroom dynamic underwent a dramatic shift. Instead of high schoolers, I was teaching elementary students foundational digital skills in Introduction to Computers. Here, we focused on keyboarding, word processing, presentation creation, and navigating the internet responsibly, with virtual reality field trips to far-off lands, outer space, and beneath the ocean’s depths—still a solitary class.

In a decade, the focus shifted from high schoolers to elementary students, using nearly the same materials (obviously different subject matter). It’s incredible to see how far technology in education has come and the endless possibilities it offers. Yet, many assume today’s students, deemed digital natives, navigate the digital landscape effortlessly. While partially true, fundamental skills still need nurturing.

Some argue schools should shield students from omnipresent screens, but overlook the critical importance of digital literacy. It’s not just about devices; it’s about skills like information evaluation, digital etiquette, and design thinking.

In the dynamic education landscape, we as teachers must recognize the invaluable soft skills fostered through digital technology. Beyond technical competencies, students develop interpersonal skills, collaborating virtually, communicating effectively, and negotiating ideas. They learn adaptability and resilience, navigating challenges independently. Critical thinking thrives as they evaluate information sources and devise innovative solutions.

Crucially, digital citizenship emerges, fostering ethical behavior and responsible technology use. As educators, nurturing these soft skills alongside technical proficiency empowers students to thrive in an ever-evolving digital landscape.

How do I copy a sandbox?

Copying a sandbox for various reason can easily be done by following the steps:

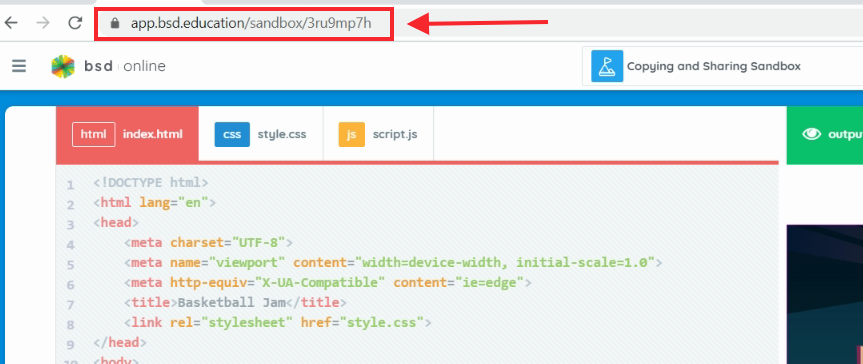
  1. Copy the sandbox link from the browser’s address bar.
  1. Share the link with your students. You can share it by projecting the link on the board, sending the link using Classroom Chat, email, or any means you may see fit and convenient for the class.
  2. Ask students to click/type/paste the link on their browser’s address bar and hit Enter.
  3. Now, this will only show them the output of the shared sandbox, view and edit the HTML, CSS and JavaScript codes but NO option to SAVE their customization.
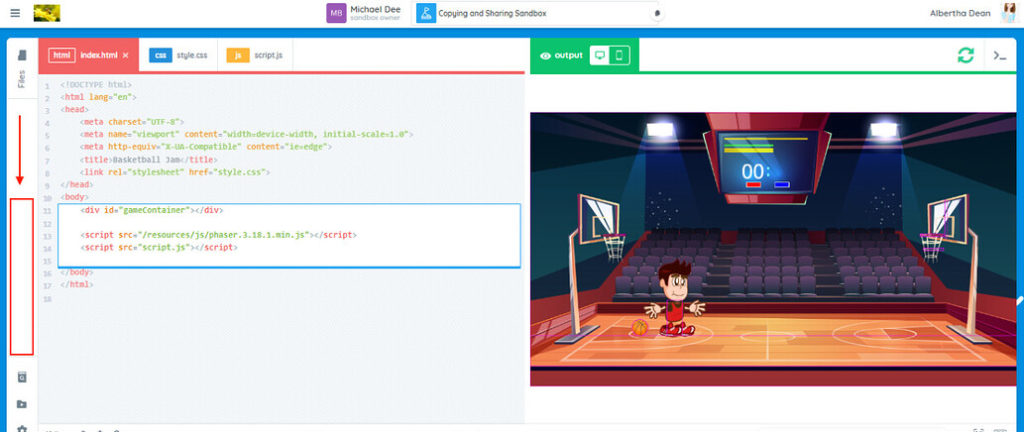
  1. Ask students to click on the “Make a copy of this sandbox” button next to the Sandbox title.
  1. This will prompt to rename the sandbox. You can give suggestions on how they can name it. Click on the “Make a copy” button once done.
  1. Once a sandbox has been successfully copied, students can now start customizing it. The sandbox will also be included in their own portfolios which they can access anytime.

If you have questions or concerns, let’s talk! Feel free to send an email to support@bsd.education or “start a conversation” through chat support!

Discovering the Best Age for Students to Begin Coding

Are you wondering when is the right time for your child to start learning code? It’s a question that’s on the minds of parents, teachers, and students everywhere. Well, let me tell you – there’s no need to wait for a specific age or grade level. In fact, students can start learning code as soon as they can read!

Here at BSD Education we’re all about making code accessible and easy to understand. We believe that anyone, regardless of their unique interests, can learn code and apply it in ways that enhance their academic and extracurricular pursuits.

Think about it – learning to code is like learning a new language. And just like with any language, the earlier you start, the easier it is to pick up. Plus, coding is a skill that can be applied to so many different areas – from creating websites and apps to analyzing data and solving complex problems. It’s like having a superpower that can open up a world of opportunities.

So, whether students are into art, music, science, or anything in between, learning to code can complement their passions and take their skills to the next level. Imagine creating interactive art installations, composing music with computer algorithms, or conducting scientific research using data analysis – the possibilities are endless!

But it’s not just about the practical applications. Learning to code also teaches valuable skills like problem-solving, critical thinking, and creativity. It’s like a mental workout that strengthens the brain and prepares students for success in any field they choose to pursue.

Now, I know what you might be thinking – “But I don’t know anything about coding! How can I help my child learn?” Well, fear not! There are plenty of resources available to help both you and your child dive into the world of coding. From online tutorials and coding games to local coding clubs and camps, there are endless opportunities to explore and learn.

And let’s not forget the power of trial and error. Coding is all about experimenting, making mistakes, and figuring out how to fix them. It’s a process of discovery and growth that encourages resilience and perseverance – valuable life lessons that extend far beyond the computer screen.

So, whether your child is just starting to read or well on their way to becoming a bookworm, there’s no better time than now to introduce them to the exciting world of coding. Who knows, they might just discover a passion that shapes their future in ways they never imagined. And hey, you might even learn a thing or two along the way!

So go ahead, embrace the digital age, and let’s code our way to a brighter future – one line at a time.

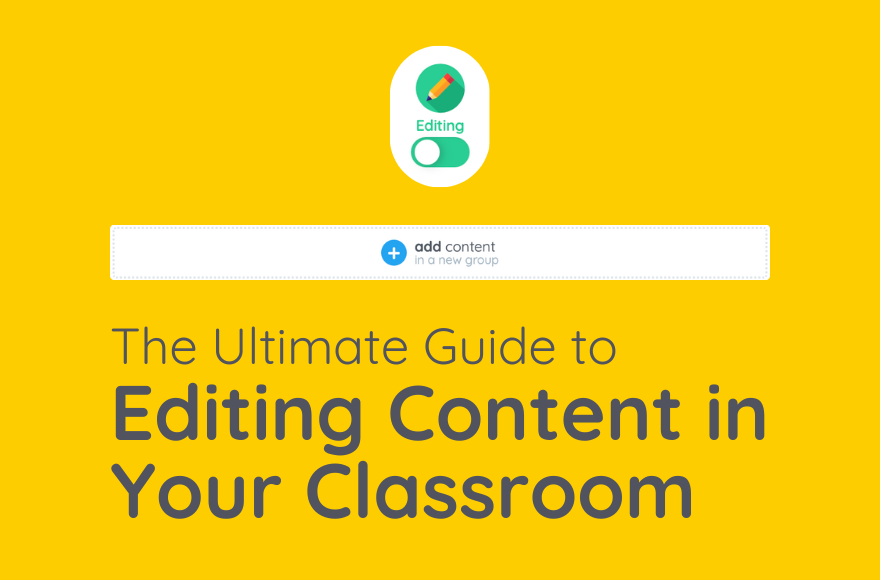
The Ultimate Guide to Editing Content In Your Classroom

After creating a classroom, you can still edit the content if you want to remove or add lessons/projects. Follow these easy steps on how to do it:

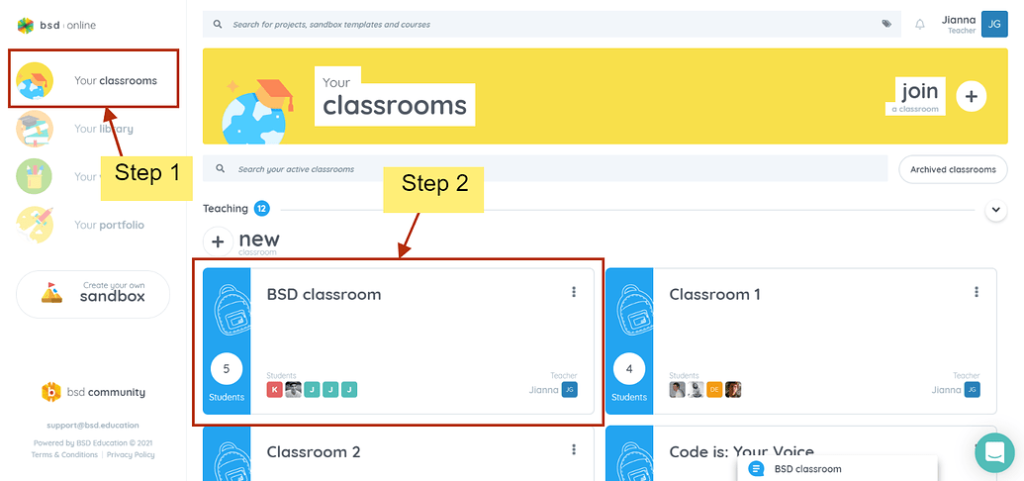
Step 1: Click “Your classrooms”

Step 2: Click the classroom you want to edit

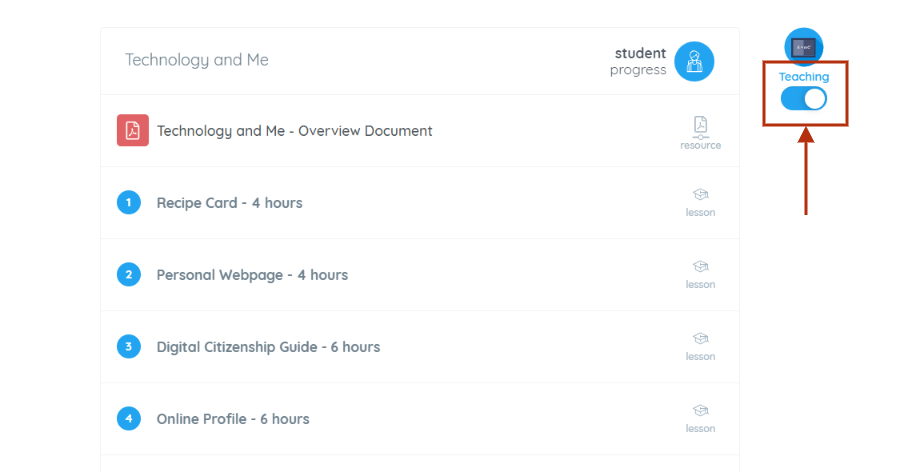
Step 3: Toggle from “Teaching” to “Editing” mode.

Now that the classroom is unlocked, you can do changes like removing and adding projects, sandbox templates and custom steps in the same course.

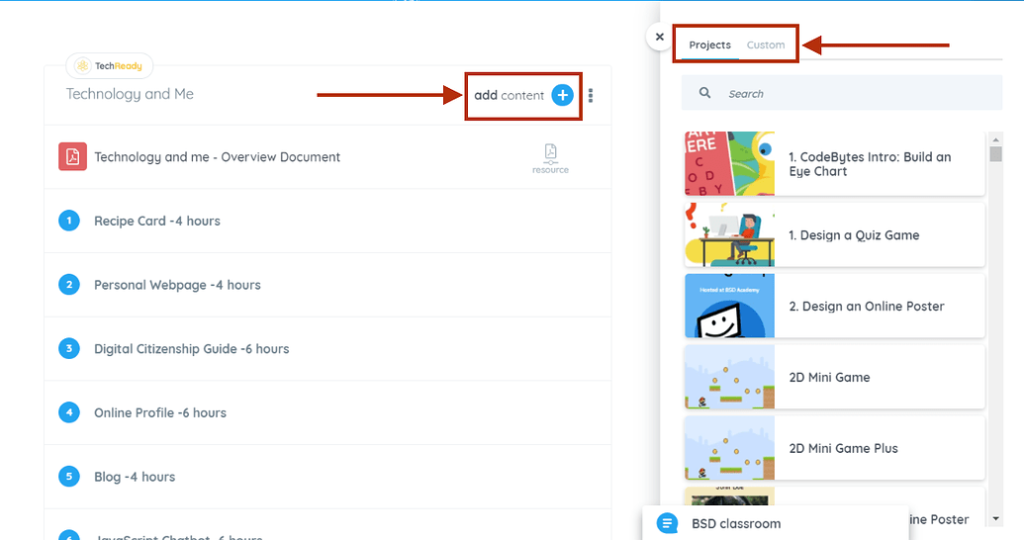
To add additional content to the classroom
Click the link “+” sign to see the classroom resources available. The additional content will go to the bottom of the classroom content list.

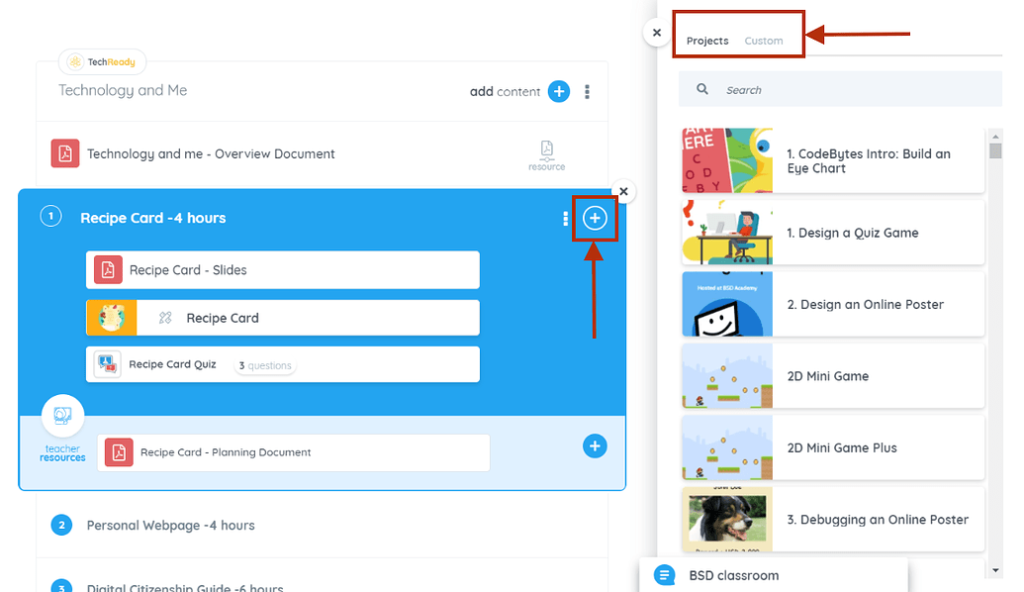
You can also add additional content inside a folder.

If you wish to re-order the classroom content, possible by just dragging it anywhere inside the same content group. Here’s a gif to explain the re-ordering of classroom content.

To remove content from the classroom
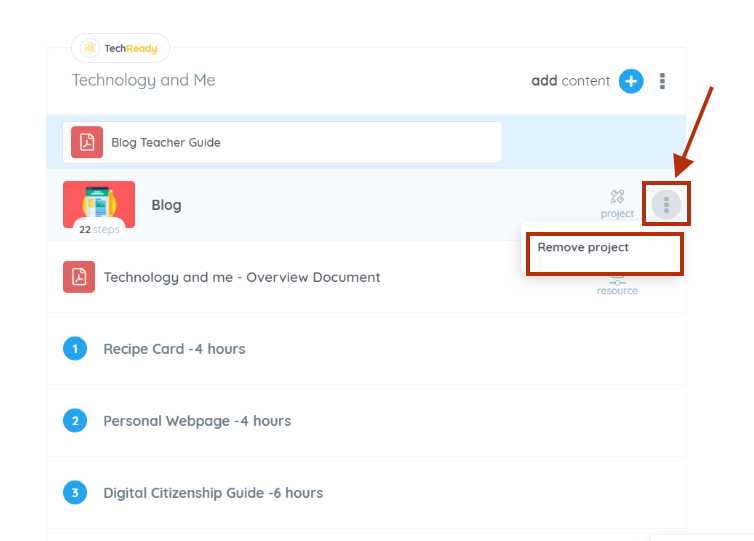
Hover over the content you want to remove and the three dots will display then click “Remove”.

Inside the folder, this button is also available. Here’s a gif for reference.

Another thing you can do as a teacher is to control the resources visibility 1 in the classroom.

If you have any questions or experiences to share, feel free to make a post here in the BSD community site.

Enhancing Workplace Settings in BSD Online

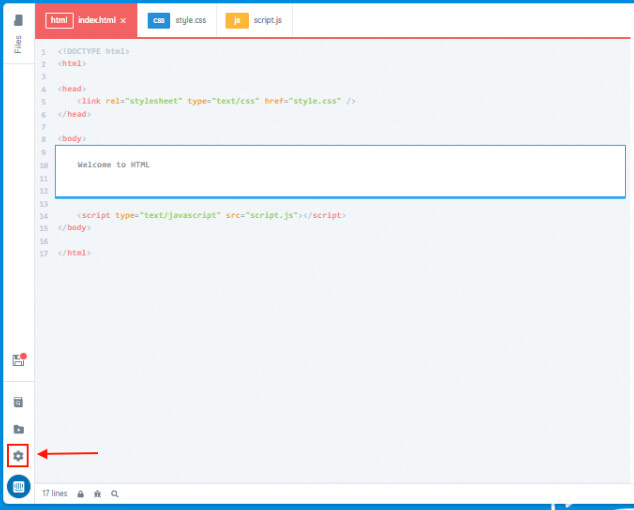
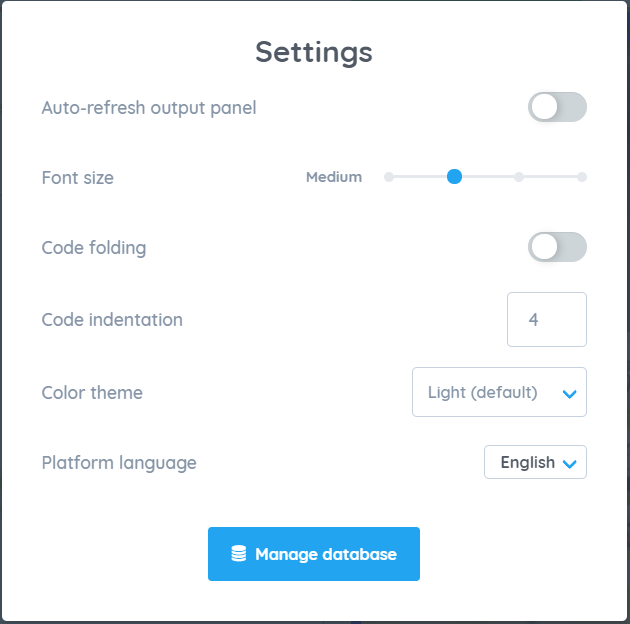
Your workspace is customizable and can be adjusted to your preference. To access the Settings, click on gear icon on the lower right hand side of the screen. See below:

This settings window is mainly for visual and performance preference changes. Let’s get into the items in detail.

1. Auto-refresh output panel

When the Auto-refresh output panel is enabled, the “Run code” button will automatically run and the changes will show on the output screen real-time. On the other hand, when it is disabled, you have to manually click on the “Run code” button to display the changes.

Run code button

2. Font size

This refers to the font size of the text in the Instructions and the Code box. Options are Small, Medium, Large and X-large. This is very helpful especially when presenting in front of your students using a projector.

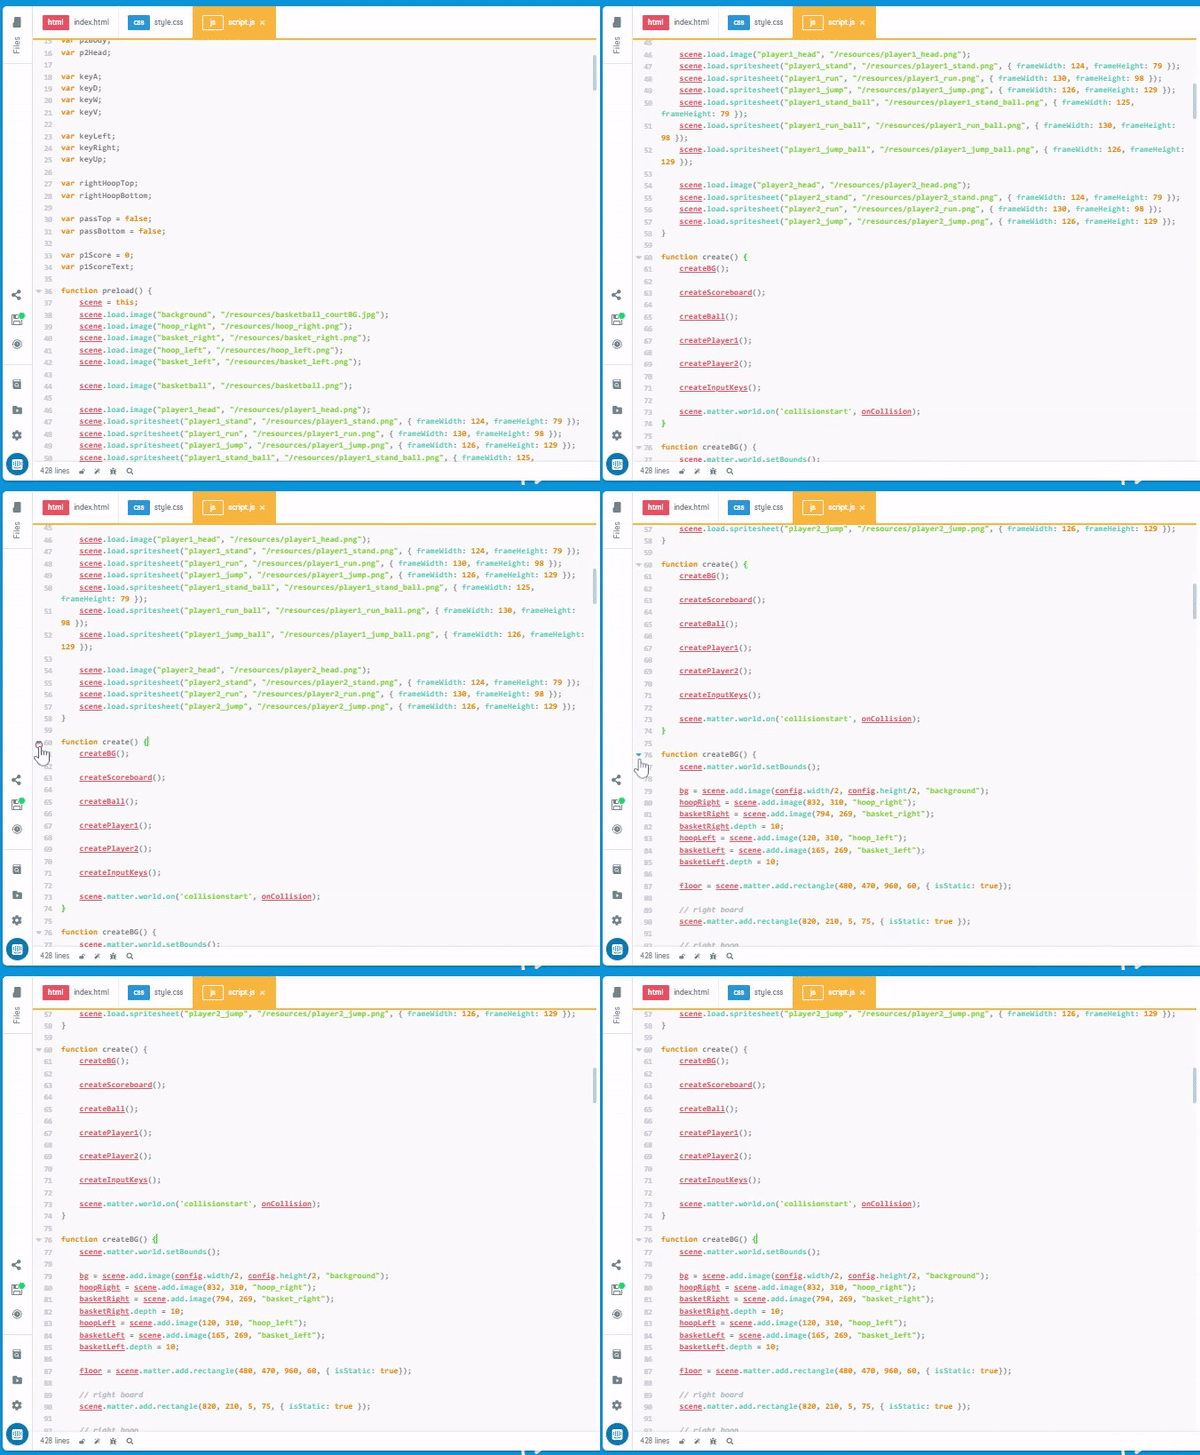
3. Code folding

Code folding when enabled can make the code collapsible/expandable. This is another way of tidying and organizing your code.

4. Code indentation

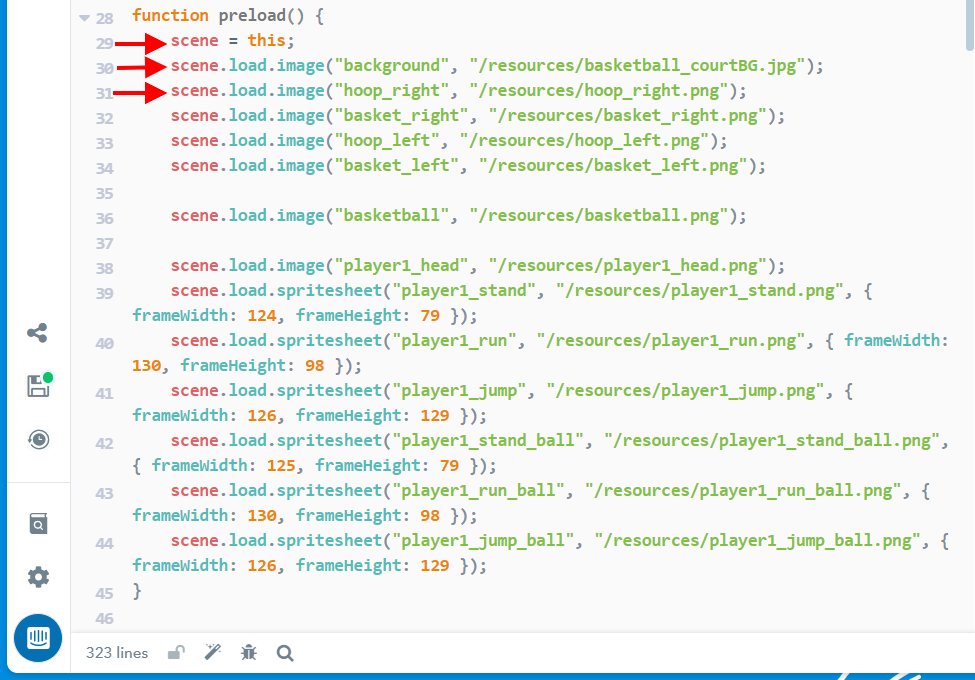
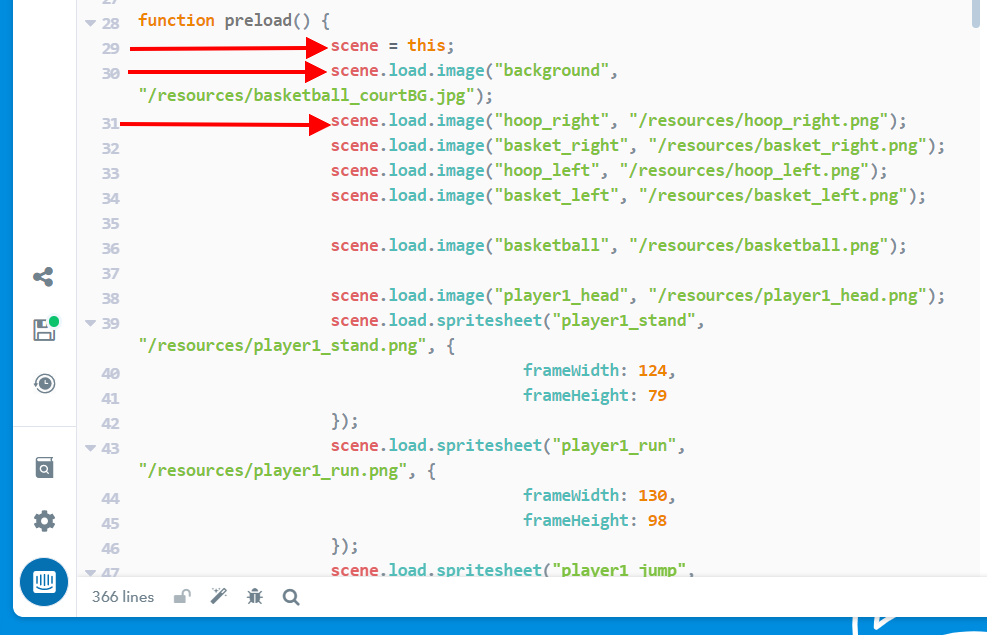
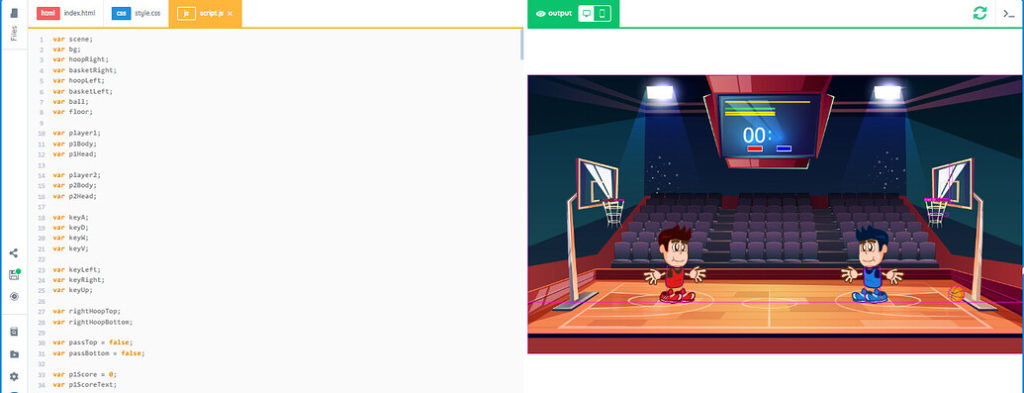
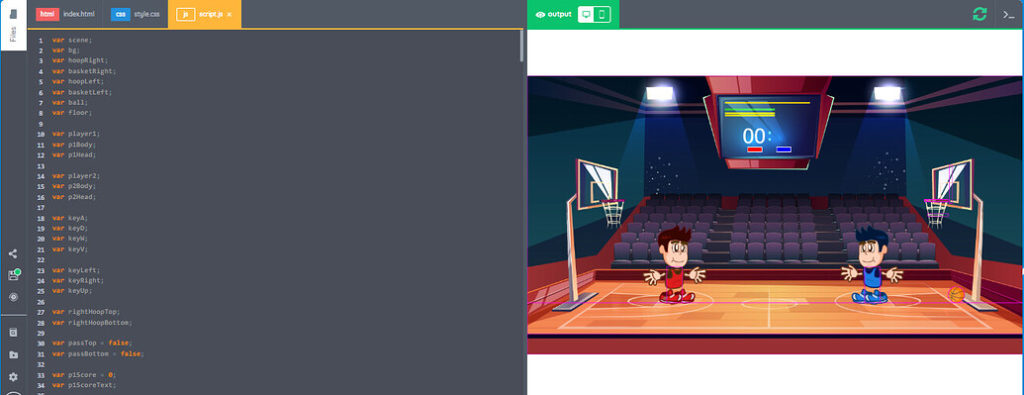
This gives the code an indentation from the left. This will only take effect when you click on the “Tidy code” button. The images below show the difference between 1 and 6 indentation.

5. Color theme

You can choose between Light mode (default) and Dark mode to match your color theme preference.

6. Platform language

You can toggle between languages that are set up for your organization(if available).

If you have questions or concerns, let’s talk! Feel free to send an email to support@bsd.education or “start a conversation” through chat support!