How to Share Your Classrooms with Co-Teachers

Classroom sharing is a new feature we made available for multiple teachers to have access to a single classroom. All teachers will have the same permissions to the classroom like adding/removing students, adding/removing content and renaming the classroom. The original owner of the classroom is responsible for adding a co-teacher/s by following the instructions below:

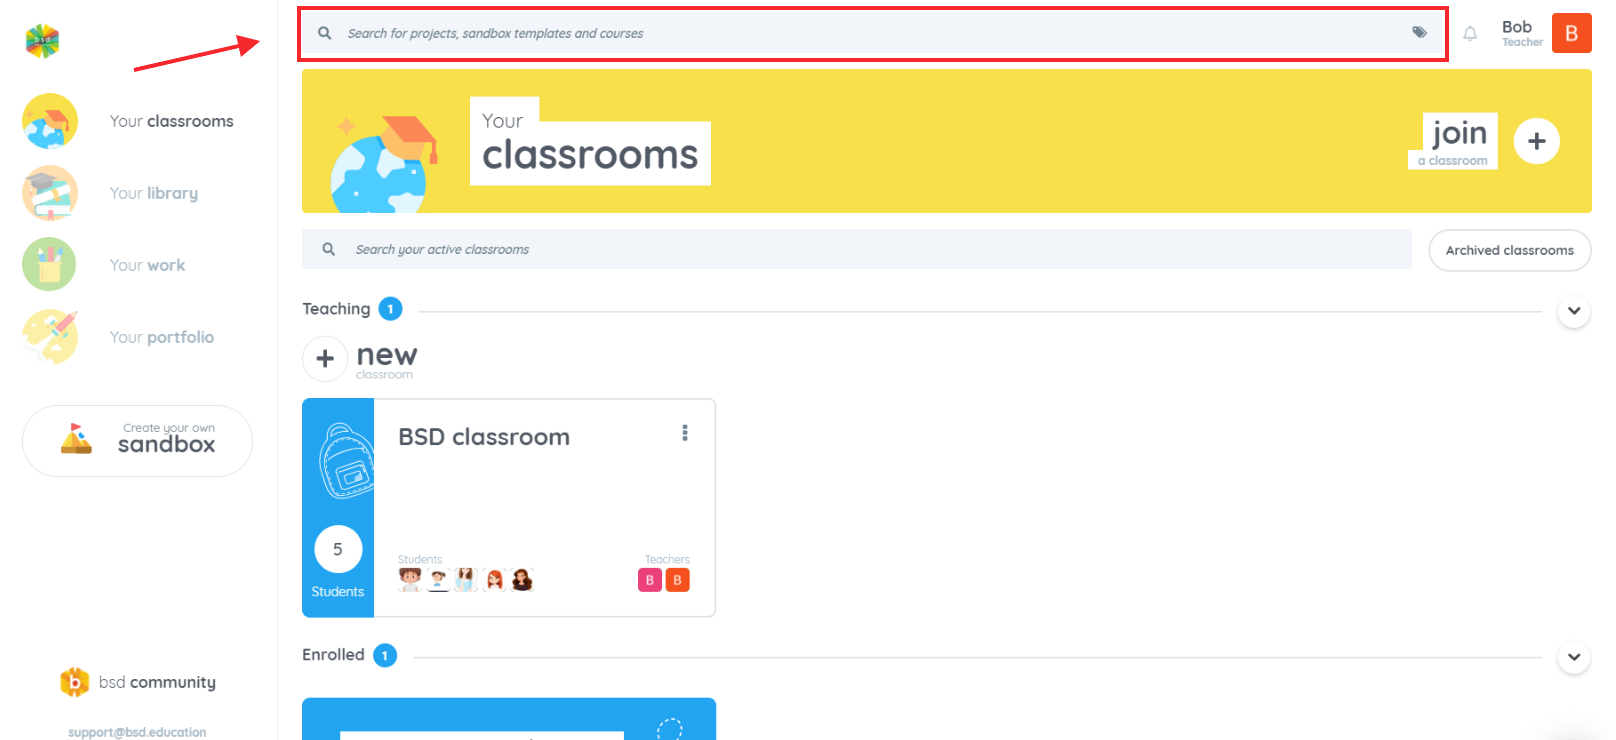
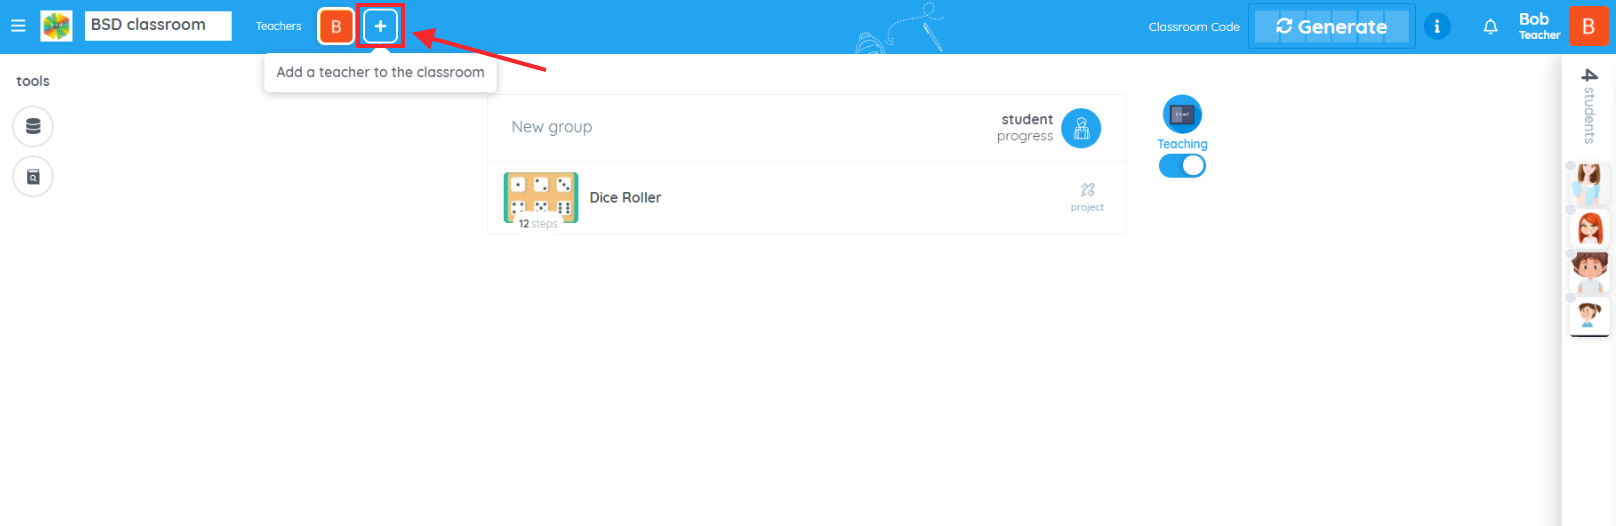
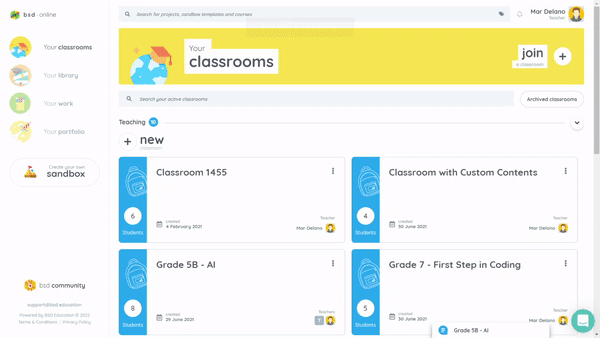
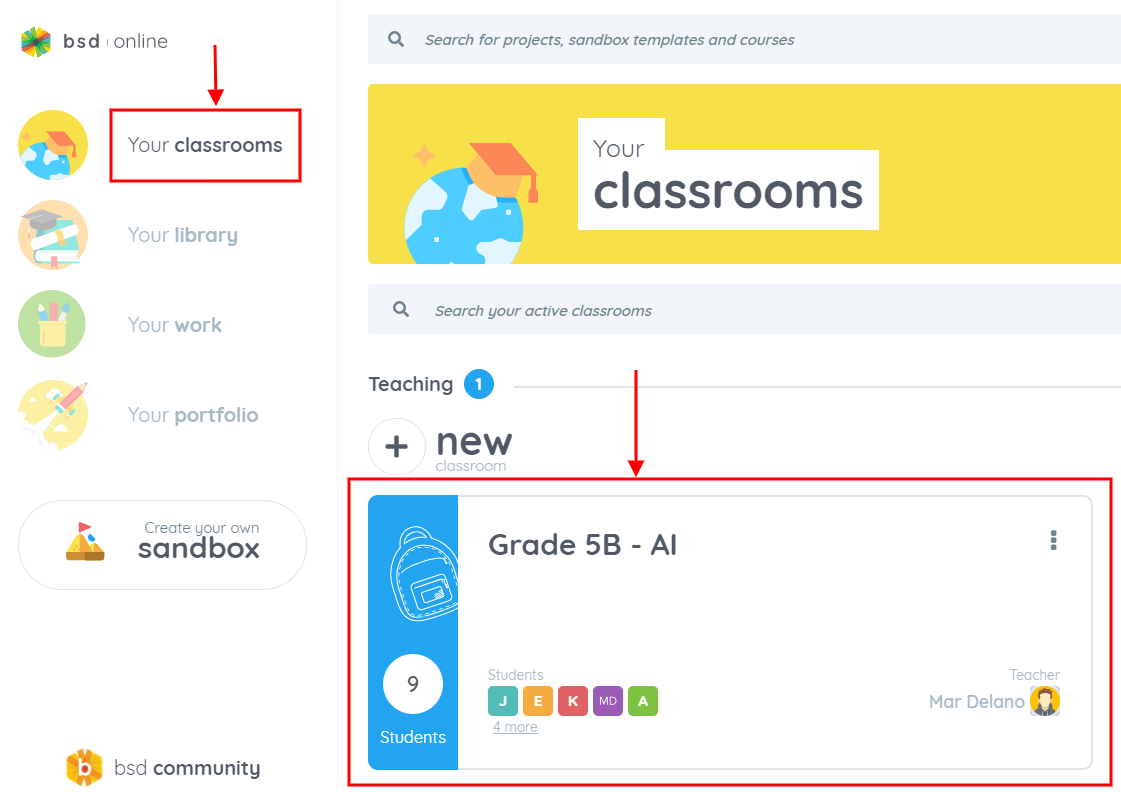
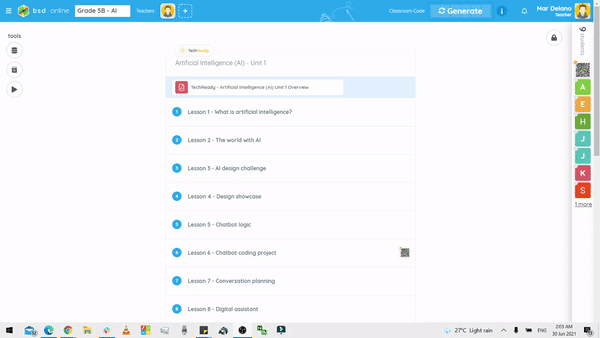
1. Once you are logged in to your account, select the classroom you want to share with your co-teachers.

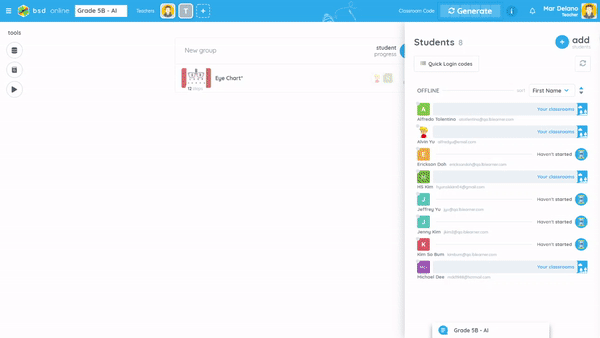
2. Inside the classroom, click on the plus “+” button beside your account avatar.

image

3. Search for the name or email address of the co-teacher you wish to add to the classroom. Alternatively, you can use the scroll bar to drag up and down search for the teacher’s name manually. Click on Add button beside their name.

image

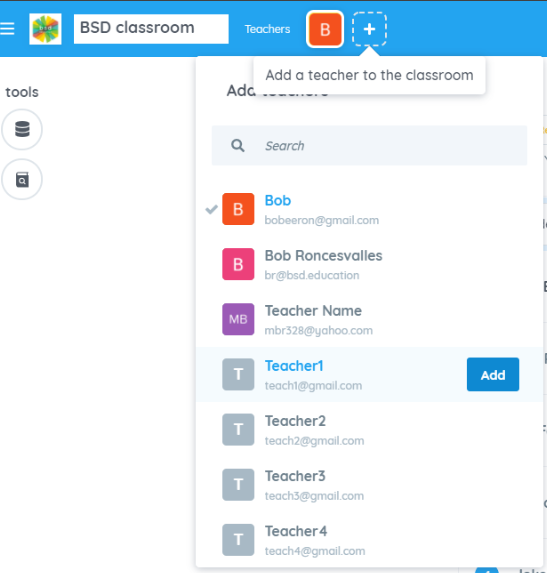
4. You can add up to 9 teachers (classroom’s maximum is 10). This is also where you can remove a teacher’s access to the classroom.

If you have questions or concerns, let’s talk! Feel free to send an email to support@bsd.education or “start a conversation” through chat support!

JavaScript Quick Reference Guide

If you’re new to the world of web development, you’ve probably heard this term thrown around a lot. So, what exactly is Javascript? In simple terms, it’s a programming language that’s commonly used to make web pages interactive and dynamic.

When you hear developers talking about Javascript, you might also come across terms like “functions”, “variables”, “DOM manipulation”, “events”, and “AJAX”. These are all core concepts of Javascript that you’ll need to understand as you dive deeper into web development.

Whether you’re looking to build a simple website or a complex web application, having a good grasp of these Javascript fundamentals is essential.

So, if you’re ready to level up your web development skills, getting familiar with these core Javascript terms is a great place to start. Happy coding!

Vocabulary

The core terms you’ll hear when discussing JavaScript.

JavaScript | read more
JavaScript is a programming language that most of the web is built on. In the house analogy of web design, JavaScript is the brains of the page: it has “sensors” and routines to interact with user inputs and actions. It builds on HTML’s content and CSS’s style, but unlike CSS, JavaScript can perform most tasks independently of the front-end (what you see).
Variable | read more
var age = 10;
var name = “John”;
var canDrive = false;
A way for your computer to store little pieces of information. A variable has a name and a value.The name, when referenced, will return whatever it is equal to.Variables can be information of any data type.
Data Type | read more
var integer = 10;

These are the main types of information that can be used in scripting.Integers are numbers. They can have math performed on them, and make up the backbone of everything.
var string = “Hello World!”;Strings are text. JavaScript can’t use them for logic or math, but they are used for most output you see from your code.
var boolean = true;Booleans are a binary logical statement. true/false, 1/0, (something)/null are all boolean values.
Concatenation | read more
var greeting = “My name is ” + name + “. I am ” + age + ” years old.”;You can combine different strings, numbers, and variables the same as you would in math: by adding them together. In this case, we take the words in our message, then break from text to add our variable name dynamically into the sentence, then break back into text.
Operator | read more
var yearsUntilCanDrive = 16 – age;Plus, minus, multiply, divide, square, modulus, etc. Operators work exactly like math problems, and follow the PEMDAS order of operations when working with numbers.
Function | read more
function myFunction() {
    alert(‘Hello World!’);
}
A set of commands that can be run through all at once. Functions are one of the most powerful programming tools because you can write a set of commands that can be carried out over and over again. 
Conditions | read more
if(yearsUntilCanDrive < 0) {
    alert(‘You can drive!’);
    canDrive = true;
}
else {
    alert(‘Sorry, you will have to wait ‘ + yearsUntilCanDrive + ‘ years before you can drive!’);
}
A piece of code that checks if something is true or false, and only runs the code inside if the condition is met. Else it runs a different piece of code. 
This is also called an if-statement, or a logic gate.
Parameters | read more
multiply(5, 200);

function multiply(x, y) {
    alert(x * y);
    // ^ returns 1000
}
Parameters are variables that you can require to be passed into a function, allowing you to change the output based on your input.
Array | read more
var fruit = [‘apple’, ‘orange’, ‘kiwi’];

var favFruit = fruit[0];

// favFruit equals ‘apple’
A type of variable that stores a list of data instead of just one value. Arrays can store words and numbers like variables, but also other variables.
To get the value of one array item, call the list number of it. Note that arrays begin counting at 0 instead of 1.
For Loop | read more
for(var i = 0; i < numberOfTimes; i++) {
    alert(“This has run ” + i + ” out of ” + numberOfTimes + ” times.”);
}
Loops are handy if you want to run the same code over and over again, each time with a different value.
A loop takes a temporary var i, which starts at 0, runs a piece of code, then increases by 1. This happens until it reaches the target number of times you want it to run.
Variable Scope | read more
alert(carName);
// ^ this would return “undefined”

function myFunction() {
    var carName = “Volvo”;

}
The places a variable can be used is affected by where it was made: a variable created inside a function will only be remembered inside that function. A variable made outside of any function can be used in any function. This is called a global variable.Where the global variable is announced on the page doesn’t matter, as long as it’s above whatever code uses it (however functions don’t care because they are called after the page reads the script the first time through).
Comments | read more
// I’m commenting on this situation
Comments are just as useful as they are in any other coding language: They are used to leave messages, define code sections, and “cross out” unwanted code without having to delete it entirely. This syntax is the only difference between JavaScript comments and other languages.

A Cheat Sheet to CSS

CSS might seem daunting at first, but it’s a powerful tool for styling your website once you understand it. Let’s explore the basics.

Selectors in CSS act as detectives, allowing you to pinpoint specific elements on your page. You can target elements by their type (e.g., <h1>, <p>), class (.classname), ID (#idname), or their relationship to other elements.

With your target selected, you can then apply styles using properties and values. Properties describe the appearance or behavior of an element, such as color, font-size, and margin. Values specify the property details, like “red” for the color property.

This overview introduces key CSS concepts: selectors, properties, and values. Now, you’re ready to start styling!

Below is a glossary of CSS concepts, selectors, properties, and values.

Vocabulary

These are the terms most used when discussing CSS.

Cascading Style Sheets (CSS) | read more
Cascading Style Sheets are the file type that our styles are written into. In the early web, before it became its own language, styles were simply added as attributes of individual elements. This method was clunky, ugly, and most importantly, not scalable. The purpose of CSS is to apply styles to our page en mass with as much efficiency as possible. To do this, we use selectors (below) that target whole groups of objects and apply consistent styles across our page. 
The “Cascading” part of the name refers to the fact that styles can be written and overwritten. For instance, if I set the width of an <img> tag to 300px, but further down in the page set the width of images to 100px, the most recent mention takes precedent. However, there are many rules and interactions determining what styles take charge.
Selector | read more
h1 {}

#gallery {}

.icon:hover {}
html::after {}
CSS works symbiotically with HTML. It exists to style and augment HTML elements, but can’t do anything without them. 
The way we target specific elements are with selectors. A selector can have the name of a tag, class, ID, or combinations of those so you can find exactly the element you want to style.
All selectors are followed by a pair of curly brackets, which is where your styles go.
Property | read more
h1 {
  color: lime;
  background: royalblue;
  font-size: 300%;
  margin: 10px 30px;
  padding: 20px;
}
Selectors choose which elements to style, and the properties are what you change.
There are hundreds of CSS properties that can be changed. You’ll never memorize them all, but this glossary will cover the most common and helpful of them.
Value | read more
button {
  color: purple;
  background: black;
  padding: 20px 15px;
  animation: blink 5s linear 100ms infinite both;
  position: fixed;
  top: 0;
  left: 100px;
}
With every property comes a value. By default every element comes with a value attached to each property, usually “initial”, “default”, “none”, or “0”. It depends on your browser’s default settings.
By writing your own values you are over-ruling the default values that come with every property.
Comment | read more
button {
  color: purple;
  background: black;
  padding: 20px 15px;
  /* Add animation for button to fade in and out */
  animation: blink 5s linear 100ms infinite both;
  /* position: fixed;
  top: 0;
  left: 100px; */
}
Just like with HTML, comments are passages of text that are ignored when the coe is read. They are just there for developers to see. Comments are helpful for leaving yourself (or others) notes, marking sections of your page, or temporarily “crossing out” code that you don’t want, but you don’t want to delete either.
The only difference of comments between languages is how it is written.
The Box Modal | read more
div {
  background: black;
  width: 100px;
  height: 50px;
  padding: 20px 15px;
  border: 5px solid red;
  margin: 10px;
  /* this div’s box is 160px wide and 120px tall */
}
The box modal is the idea that all elements on a page take up some amount of room in a rectangle. The “box” is the total amount of space between four measurements. These are the element’s set height/width, plus the height/width of its padding, border, and margin combined. The border makes up the edge of the perceived box, the padding is the space inside, and the margin is the space outside.
Color Mode | read more
div {
  color: rgb(255, 255, 255); /* white */
  color: rgb(0, 0, 0); /* black */
  color: rgb(255, 0, 0); /* red */
  color: rgba(0, 255, 255, 0.5); /* transparent purple */
}
RGB values tells the computer how much Red, Green, Blue to mix together. Each can be mixed to make a different shade of color with a maximum of 255 of each color.rgba adds “alpha” or transparency to your color.
div {
  color: #ffffff; /* white */
  color: #000000; /* black */
  color: #ff0000; /* red */
  color: #f0f; /* shortened purple */
}
Similar to RGB value, HEX values uses letters and numbers. First two, second two, and last two are respectively red, green and blue. They mix to create a color you desire.
div {
  color: hsl(0, 0, 100%); /* white */
  color: hsl(0, 0, 0%); /* black */
  color: hsl(0, 100%, 50%); /* red */
  color: hsl(320, 100%, 50%); /* purple */
}
HSL stands for Hue, Saturation, and Lightness. This is a common color mode if you use color pickers online, since it gives you one slider for hue (color), and a range of brightness (+/- white/black) and saturation (+/- gray).
div {
  color: white; /* white */
  color: black; /* black */
  color: red; /* red */
  color: rebeccapurple ; /* Rebecca purple */
}
You can also just write the names of the colors you want! CSS is pretty smart, and understands dozens of color-words.
It is still important to understand how other color modes work, but if you don’t need a precise hex code this is a good option too.
Units of Measurement | read more
div {
    width: 100px;
}
There are many ways to measure in CSS, some are distance, some are time, some are rotational.Pixels are the smallest whole unit of digital screens.
div {    height: 5em;
}
An em is the size of the font you’ve set (by default 16px), and is a generally scalable and nicely sized unit.
div {    margin-left: 50%;
}
A % measures the percent of the container an element is in. At the biggest level this is the width/height of the page, but can change depending on how big the box is.
div {    transform: rotateZ(200deg);
}
deg measures degrees of rotation. 0-360.
div {    transition: 0.5s;
}
s measures seconds. ms is a measure of milliseconds (1/1000th of a second, and the generic scripting time unit)

Selectors

More specific information on how to target different parts of your HTML.

All | read more
* {
    margin: 0;
}
The * symbol selects all elements at once.
Elements | read more
p {}Add styles to all HTML elements with the given name.Element names can be written the same as they are in HTML.
div {}
button {}
Classes | read more
.pageItem {}Selecting objects in html that have a class name by using a period.
IDs | read more
#bestPage {}Selecting an element with an ID by using a hashtag before the ID name.
Groups | read more
h1, h2, p {
      text-align: center;
      color: red;
}
You can use more than one selector to add styles to more than one element at a time, for instance if you wanted to align the text of all h1, h2, and p tags at once and change their color.
Children | read more
#header .nav {
  background: crimson;
}
#header .nav img {
  width: 30px;
}
You can be more specific with your selectors by targeting only elements inside of other elements (children of that element). For example only setting the width of imgs that are inside the header ID.This is very different than separating the selectors with commas: using just a space means it will target the element within the previous selector, not both the #header and img.
Pseudo | read more
button:hover {
  background: red;
}
You can add selectors that only apply when the element has other conditions applied to it. For instance this code would change the background color of all buttons that you are hovering over with your mouse.
div:active {
  background: blue;
  width: 25%;
}
Complex | read more
#gallery .imageBox:not(p):hover h3, a:hover {
  color: green;
}
You can string together any number of the techniques covered above into very specific selectors that will get you the results you want. This selector targets the <h3> tag within the imageBox class within the gallery ID, only when you are hovering over it and not the <p> tag also inside that .imageBox. It also targets all <a> tags when you are hovering on them.
Specificity | read more
* {
  color: blue;
}

h1 {
  color: red;
}

.greenText {
  color: green;
}

#purpleText {
  color: purple;
}

#purpleText:hover {
  color: lavender;
}

* {
  color: blue !important;
}
Generally, CSS uses a system of cascading from one style to the next: the most recent instance of a property will be the one used.
That is, IF they have the same selector. If two snippets try to set the same property on the same element and they have different selectors, CSS settles the dispute by looking at which selector is more specific.
The All selector (*) is the most vague selector possible, so it gets overridden by everything. After that, generic tag names, then classes, then IDs, then pseudo-selectors and various compound selectors take over. 
There is a lot of nuance that can go into specificity, however, there is a way to override that order and force your style through, which is the !important attribute after your value.
In this example all text will be blue no matter what, because we told the all selector to override everything. However, if you have more than one use of !important on a conflicting property then cascading/specificity takes over again.
Note: needing !important is usually due to poorly planned code. Don’t use it if you can avoid it.

Properties & Values

The types of styles that are being changed, and the values they are being set to.

Color | read more
h1 {
    color: blue;
}
Changing the color of text
Background | read more
body {
    background-color: blue;
}
Changing the background color of the selector, there is three ways to name your color:Hex-Code aka: #1F2A4BWord aka: blue, turquoise, crimson, .etcRGB aka: rgb(255,150,110)
body {
    background-image: url(link/to/image.jpg);
    background-size: cover;
    background-repeat: no-repeat;
}
Your background can also be an image. You can use a live link to an image hosted somewhere on the internet, or the relative path to an image you have stored in your project files.
Height & Width | read more
div {
    height: 200px;
    width: 200px;
}
Giving a height in pixels to the selector
Giving a width in pixels to the selector
Font | read more
p {
    font-size: 30px;
}
Change the size of text.
@import url(‘https://fonts.googleapis.com/css?family=Roboto’);
p {
    font-family: ‘Roboto’, sans-serif;
}
Changing the font of text. To add special fonts from the web you must either download or link to their files using an @import line. 
The second font listed is what’s called a fallback, (a universal web-font as a second option for if your first choice doesn’t load)
Border | read more
div {
    border-width: 5px;
    border-style: solid;
    border-color: blue;
    border: 10px dashed red;
    border-radius: 10px;
}
Border Width: The border thickness.
Border Style: The type of border, aka: solid, dashed, groove, double, dotted, ridge, inset, outset, none, hidden.
Border Color: The color of the border.
Border Shorthand: You can combine these three properties into one line as long as they are list as width, style, color.
Border Radius: Rounds the edges of your box on a curve.
Margin | read more
div {
    margin: 10px;
    margin: 10px 20px;
    margin: 10px 15px 20px 25px;
    margin: 0 auto;
}
Spacing outside of the element. You can generalize one value that will be used for all four sides of the container, or specify two values (y & x in both directions), OR specify all four sides (top, right, bottom, left).You can also set a margin to auto, which will evenly space the element on the page, making it centered.
Padding | read more
div {
    padding: 10px 15px 20px 25px ;
}
The spacing inside of an element. You target the different sides the same way, but you cannot set an auto padding the same as margin. 
The difference between padding and margins is like this table right here: it has padding on the inside to keep the words from touching the border, and the table has margins outside of it to keep it from touching the edge of the page.
Text Align | read more
h1{
    text-align: center;
}
Organizing the text left, center or right.
Position | read more
img{
    position: absolute;
    top: 100px;
    Left: 200px;
}
Where an element sits in the flow of the page. By default all elements are relative, meaning they appear in the order they are added to the page. However, you can make an element fixed to the top of the screen (think website headers that don’t scroll away), or absolute to one section (they scroll, but are stuck to whatever location on the page you say.
If you give an element position fixed or absolute, you must also specify where it will go relative to the sides of the page (top, left, bottom, or right), since it is outside of the normal formatting.
Animation | read more
div {
    height: 200px;
    width: 200px;
    background-color: blue;
    animation: myAnimation 4s linear 0s infinite;
}
To use an animation, you apply several values to the element you want animated.
In order, they are: @keyframes nameAnimation length in secondsTiming, linear or eased in-outDelay in secondsHow many times it plays before stopping.
@keyframes myAnimation {
0%{
    margin-left:0px;
}
32%{
    margin-left:500px
}
100%{
    margin-left:0px;
}
}
Keyframes are the individual steps for an animation.
On each frame, you can apply whatever style changes you like to the affected element.
You can create however many keyframes you want your animation to have, and how far apart to separate them (it doesn’t have to be even). The only rule is that it begins at 0%, and ends at 100%.
Flex Box | read more
div {
    display: flex;
    flex-flow: row nowrap;
    justify-content: space-around;
    align-items: center;
}

div h2 {
    flex-grow: 1;
}
The display option flex is a more advanced, but a very powerful tool. Flex is a property given to containers that can arrange the contents in any orientation. It works like text align, except it works on any elements, in any direction, in either axis.
To use it, declare the display as flex, then say which flow you want (row: horizontal, column: vertical) and whether if not you want content to wrap if it would overflow. Justify content will arrange things forwards or backwards on the chosen flow (space-around means that everything is spaced evenly from front to back) and align-items aligns the content in the opposite axis.
In this example, my items would be arranged left-to-right, with even spacing between, and are vertically centered, making a nice row of content.

How to Debug Inline Errors

Debugging is the process of identifying the error or bug in a program. This is a vital tool to use that can save time in finding and correcting a bug or error in the program to make it run in the way it is desired.

To debug errors on BSD Online we can make use of the button that displays the errors in the code. Here’s a guide on where to find this tool and how to use it.

Step 1: 

Click on the icon that looks like a bug to display code errors.

Step 2: 

When an error is found a red X mark is found next to the line where the error occurs. When you hover over the red X mark you will see what error has been made.

“Display Code Errors” button can be toggled on and off as when you want to utilize its function.

So every time you want to ensure or check that your code is error-free, please feel free to make use of the “Display Code Errors” tool.

Accessing Your Student’s Portfolio: An Easy-to-Follow Guide

Here are the steps to access your student’s portfolio. In this example, we will access Alvin Yu’s portfolio who is a student from the Grade 5B – AI classroom.

  1. Log in to BSD Online and go to Your classrooms.
  2. Select a classroom where Alvin is added as a student.
    ezgif.com-gif-maker (2)
  3. In the right panel of the window, toggle the student list to see all the students’ names in the classroom.
    ezgif.com-gif-maker (2)
  4. To view Alvin’s profile, click on her picture or avatar. The student’s profile window will appear. Scroll down to the bottom of the window and click the “Open portfolio” button. This will open a new tab where you will see the student’s portfolio.
    ezgif.com-gif-maker (4)

Got more questions? Feel free to reach us through chat or send an email to support@bsd.education.

How to Share Your Work on BSD Online?

Every piece of work or output created in BSD Online is not only saved in the student portfolio but may also be shared with anybody online.

When you’ve finished your guided project or customized sandbox and want to share it with others, click on the “Share output” icon.

1. Sharing a project:

A popup will appear when you click on the “Share output”; click on the slider to activate sharing.

step0.2

The button will turn blue, and you will be given two options for sharing the project: “SHARE LINK” or “QR” code.

Clicking the link will immediately direct you to the shared output. Hovering over the link will reveal the copy link button, which you can use to share it with others or post to social media.

Scanning the QR code with your smartphone or tablet will display the project on your device.

step2

2. Sharing your sandbox

If there are just 2 options for sharing a project, there is a third way for sharing your sandbox: sharing it to your Google Classroom.

To understand more about Sharing a BSD Sandbox to a Google Classroom 5 click the link.

This way, we encourage students to put their personal taste into their work because they will be able to share it with others.

If you have any questions or feedback, please feel free to send in a message through our intercom chat or email us at support@bsd.education.

Teacher Tips: Quick Login

For easier login, your students can use their Quick Login (QL) codes instead of using their email and password. This method is only available for students and please note that login codes expire after seven days.

Here’s how you can generate QL codes for students in your classroom:

  1. Go to your classroom.screenshot-app-staging.bsd.education-2021.06.30-01_41_03
  2. View the class list and click the Quick Login code link. A new page will open displaying the QL Codes of all the students in the classroom.ezgif.com-gif-maker (5)
    On the next page, you will see the date and time of QL code expiry.
    screenshot-app-staging.bsd.education-2021.06.30-02_06_10
    You can toggle the grid view by clicking the highlighted icon on the image below.screenshot-app-staging.bsd.education-2021.06.30-02_10_29
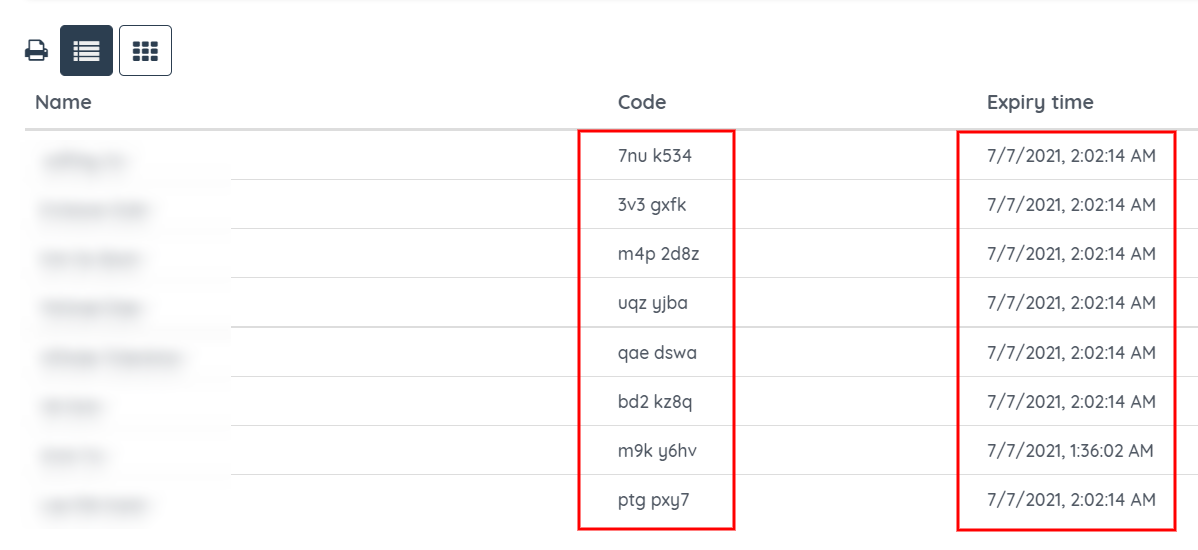
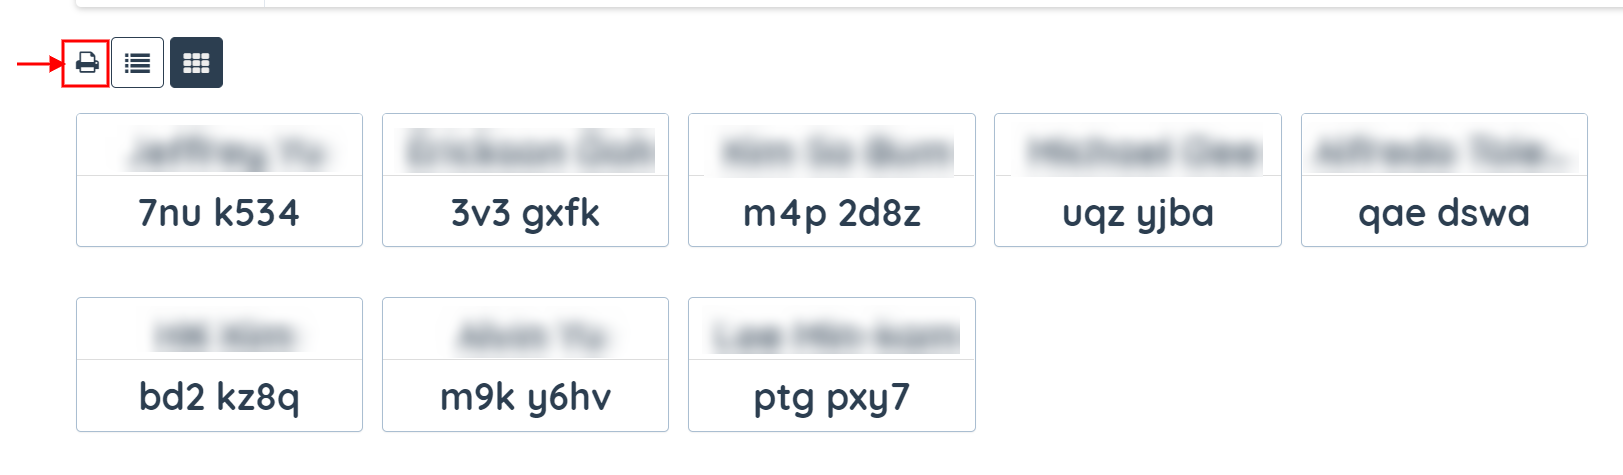
If you want to print the list, click the Print icon.
    screenshot-app-staging.bsd.education-2021.06.30-02_12_44

You can also view QL codes individually by following the step below. For this example, we will take a look at Alvin Yu’s QL code:

  1. Open the student list from the right panel and view the student’s profile by clicking his picture.
  2. Click the Generate button at the upper-right corner of the dialog box.
  3. The student’s QL code will then appear.

See the animation below to see how it is done:

ezgif.com-gif-maker (6)

Please note that clicking the copy button will copy the quick login link. The QL link looks like this:

screenshot-docs.google.com-2021.06.30-20_32_46

Once you copied the QL link, you can send it directly to the student. If a student copies and pastes this to the URL, he or she will be redirected to your classroom.

If you want to just send the QL code, just highlight and copy the code. The student can then use this code on the login panel as shown in the picture below:

screenshot-app-staging.bsd.education-2021.06.30-02_34_23

If you have futher question about QL codes, or help regarding BSD Online, please get in touch with us using Intercom.

How to search for content

There are 2 ways to search for content i.e. projects or sandbox templates. The first way is by using the search bar at the top when you are in your BSD Online account homepage.

image

When using the search bar, you can enter keywords or the subject of the project/sandbox template you are looking for.

image

You can also use the toggle project tag chooser to filter out the projects by subject relevance. This will help narrow down your search to the specific content you are looking for.

image

Please note that projects and sandbox templates have different icons:

Project icon

Sandbox template icon

Another way of searching content is by browsing the “Your library” section that can be found on the left-hand side of your BSD Online homepage. This houses all the available courses in your organization.

image

You can also get back to your projects that are still in progress by clicking on Your work. This also lists down all the projects you have completed.

image

Access the sandboxes you want to customize by choosing “Your portfolio”,

image

If you have questions or concerns, let’s talk! Feel free to send an email to support@bsd.education or “start a conversation” through chat support!

How to Add PDF in a classroom

Have you ever thought of customizing your BSD classroom by adding a PDF of your choice? Here at BSD Education, we help support the creativity of the teacher and to make them feel that they have a personal touch to their own online classroom. Introducing the addition of PDF custom to your classroom. Simply follow the steps after logging into BSD online:

Step 1: Click the lock icon to unlock the classroom content.

screenshot-app-staging.bsd.education-2022.03.18-15_45_20

Step 2: Now that the classroom is unlocked, click the “+” icon to add the additional content.

screenshot-app-staging.bsd.education-2022.03.18-16_08_25

Step 3: A sliding menu will appear on the right side of the screen. At the extreme right of the menu, the Custom tab is located, click to view the available custom add-ons.

screenshot-app-staging.bsd.education-2022.03.18-16_12_31

Step 4: Click on Resource to upload a PDF from your computer.

image

4a: Hit the upload button.

screenshot-app-staging.bsd.education-2022.03.18-16_29_41

Step 5: Finally, the PDF is added to your classroom. Don’t forget to lock the classroom content to avoid any accidental changes.

Note: Custom PDFs can be added in a classroom as stand-alone content. This means that you can add a Custom PDF even if your classroom does not contain any BSD course or project.

screenshot-app-staging.bsd.education-2022.03.18-16_32_04

The added PDF is visible to both teachers and students. Thus, if a teacher wishes to move it to “teacher-only” view, here are the steps to follow:

Step 1: Make sure the lock icon is set to unlock.

Step 2: Hover over the PDF and you will see the three vertical dots next to the resources icon. Click that to see the options – Move to teacher-only and Remove.

screenshot-app-staging.bsd.education-2022.03.18-17_31_19 (2)

2a: Move to teacher-only – this allows the teacher to make a PDF visible only to teachers. After clicking the “Move to teacher-only” button, notice that the resources icon was removed.

Teacher-only view

screenshot-app-staging.bsd.education-2022.03.18-17_47_32

Student and teacher view

screenshot-app-staging.bsd.education-2022.03.18-18_30_55 (1)

2b: To remove – click the “Remove” option and confirm the action.

image

If you have further questions regarding this feature, don’t hesitate to reach us through chat!

Navigating Backwards: A Guide to Returning to a Previous Step

If you want to go back to a previous step in your project, you can use the time machine feature of BSD Online. You can use this feature to change something you have entered from the previous step. Just note that this feature is completely different from resetting a step of a project and restarting a project. Resetting a step of a project will just reset the current step. Restarting a project means that you will start the project back to the first step.

For this post, I will show you how you can go back to a specific step in your project. So if you want to do otherwise, please have a look at the following posts:

In this post, we will go back to Step 2 of a student’s project which is currently at Step 8.

  1. Go to BSD Online and log in to your account.
  2. Go to your classroom and open the project. In this example, notice that the student is now in Step 8 of the guided project.
  3. You can use the back arrow button to navigate through previous steps until you reach the desired step.

The other way to do this is to use the time machine feature. To access it, click the project title to display the list of steps and select the step you wish to go to. The view will refresh and you will then be taken to the step you have selected. See the sample video below:

How to go to a previous step

If you have further questions about this feature, please feel free to reach us through chat.